
Scheduled emails
Send a report or a dashboard by email on a schedule, in the message or as a CSV, Excel or PDF file, and follow every email in the history.
A scheduled email sends a report or a dashboard to a list of people on a recurring schedule. The roles an admin has allowed create them. Everyone else receives them.
Who may schedule emails
An admin chooses the roles that may schedule emails under Manage, Configuration, in the setting rights.email_roles. It starts with Administrator alone. Being an author or an admin does not include it.
| You | See | Can do |
|---|---|---|
| Your role may schedule emails | Schedule an email on reports and dashboards, Scheduled emails in the menu, New scheduled email, Send now, Send me a test | Create scheduled emails, and change, pause, delete, test and send your own |
| You are an admin and your role may schedule emails | The same, and the tabs All scheduled emails, History and Errors for everyone | The same on anyone's scheduled email |
| You are an admin and your role may not schedule emails | Scheduled emails in the menu, with every tab | Read only |
| Your role may no longer schedule emails, and you scheduled some before | Scheduled emails in the menu, with My scheduled emails and History | Read only |
| Anyone else | None of it | Nothing |
When a role is taken off the list:
- The emails its people scheduled keep going out, on the same schedule, to the same recipients.
- Their owner still sees them and their history, with a notice that the page is read only. The Sending switch, Send now and Edit are gone.
- An admin whose role may schedule can pause, change or delete them.
The server refuses each of these actions for a role that may not schedule, whatever the screen shows.
Create a scheduled email
- Open a report or a dashboard, click the gear icon at the top and choose Schedule an email. Or open Manage, Scheduled emails and choose New scheduled email in the top bar.
- Fill in the five steps. Each step has its own tab, and every tab opens from the start, so you can fill them in any order.
- Read the line under the tabs. It shows your choices on every step: what is sent and with which filters, the format, the number of recipients and of emails, and the schedule in words.
- On the Message step, choose Send me a test to receive the email once, yourself only.
- Choose Save scheduled email on the last step.
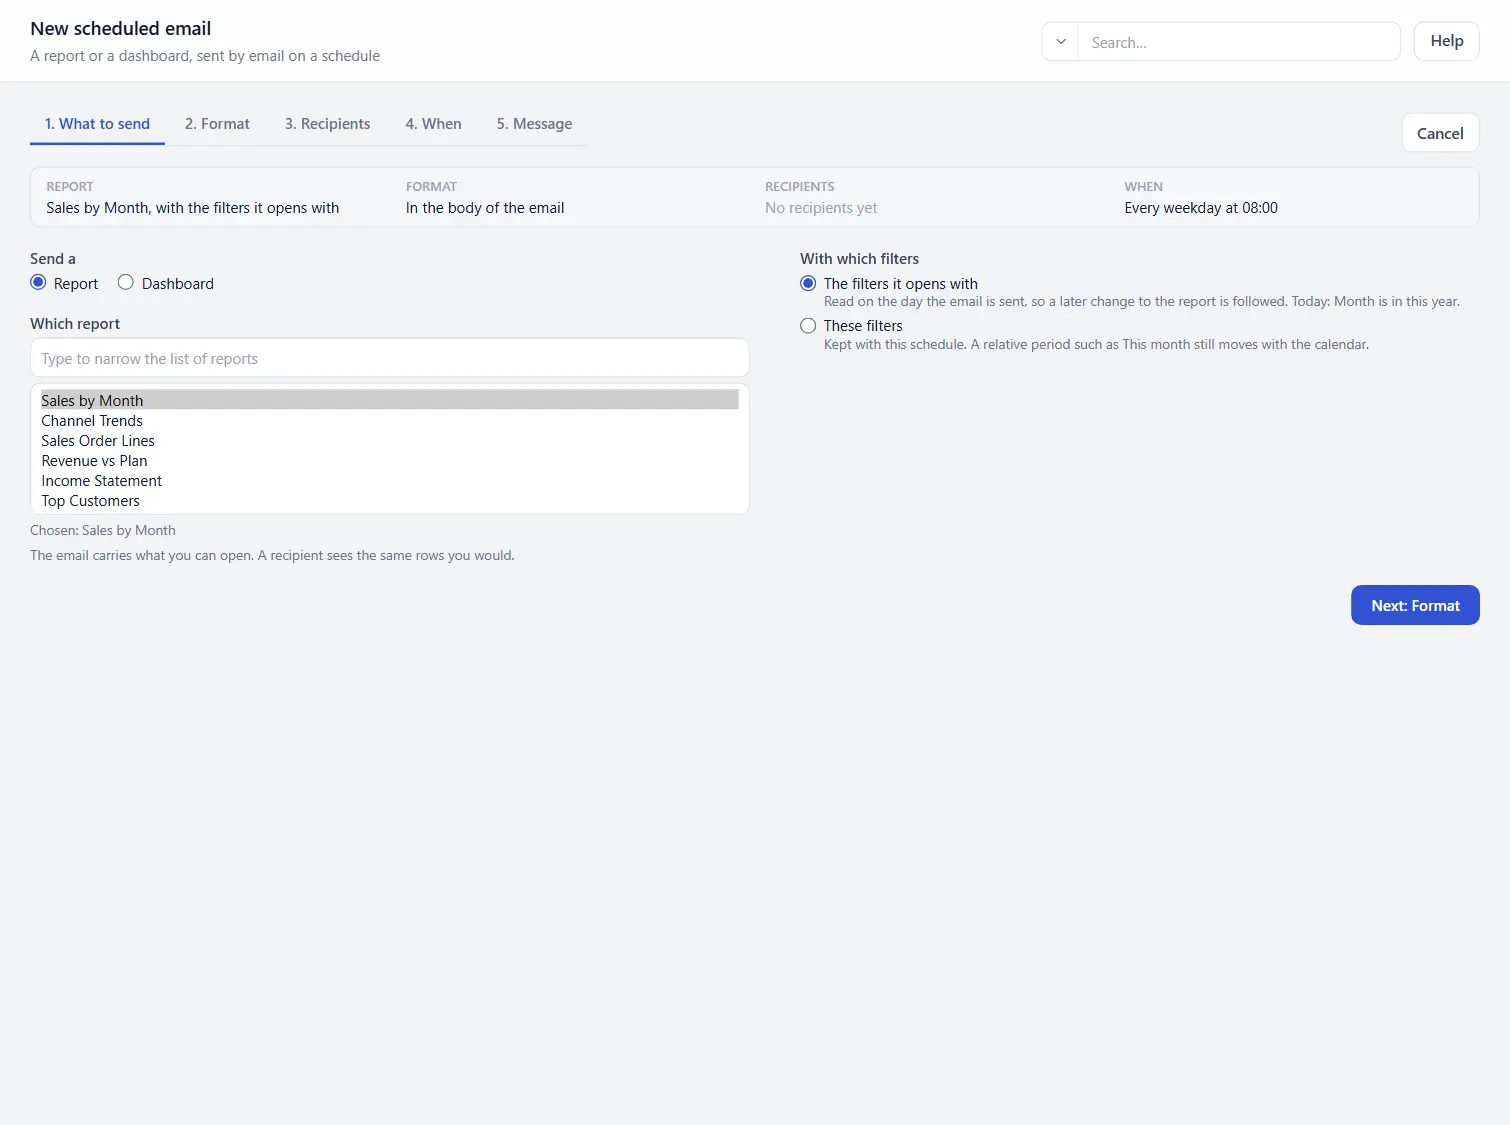
Next opens the following step and Back the one before. Moving between steps keeps what you entered.
Step 1: What to send
- Pick Report or Dashboard, then the report or dashboard. When you arrive from Schedule an email, it is already chosen.
- The filters it opens with follows the report or dashboard. A later change to its starting filters changes the email too.
- These filters stores the values you set here. A relative period such as "this month" still moves with the calendar.
Step 2: Format
| Format | What the reader gets |
|---|---|
| In the body of the email | The report or dashboard in the message itself, laid out like the app. See In the body of the email. |
| CSV file | Every row of a report that passes the filters, as an attached file. Reports only, because a dashboard holds several tables. |
| Excel file | The same rows as an attached workbook. Numbers stay numbers and dates stay dates, and amounts and percentages carry their number format. A dashboard gets a Summary sheet with its stat tiles, then one sheet for each table and each chart, holding the values the chart plots. A comparison trend's sheet has, for each period, the label of each point and a column for each measure. |
| PDF file | A document laid out for paper, for a report or a dashboard. See PDF. |
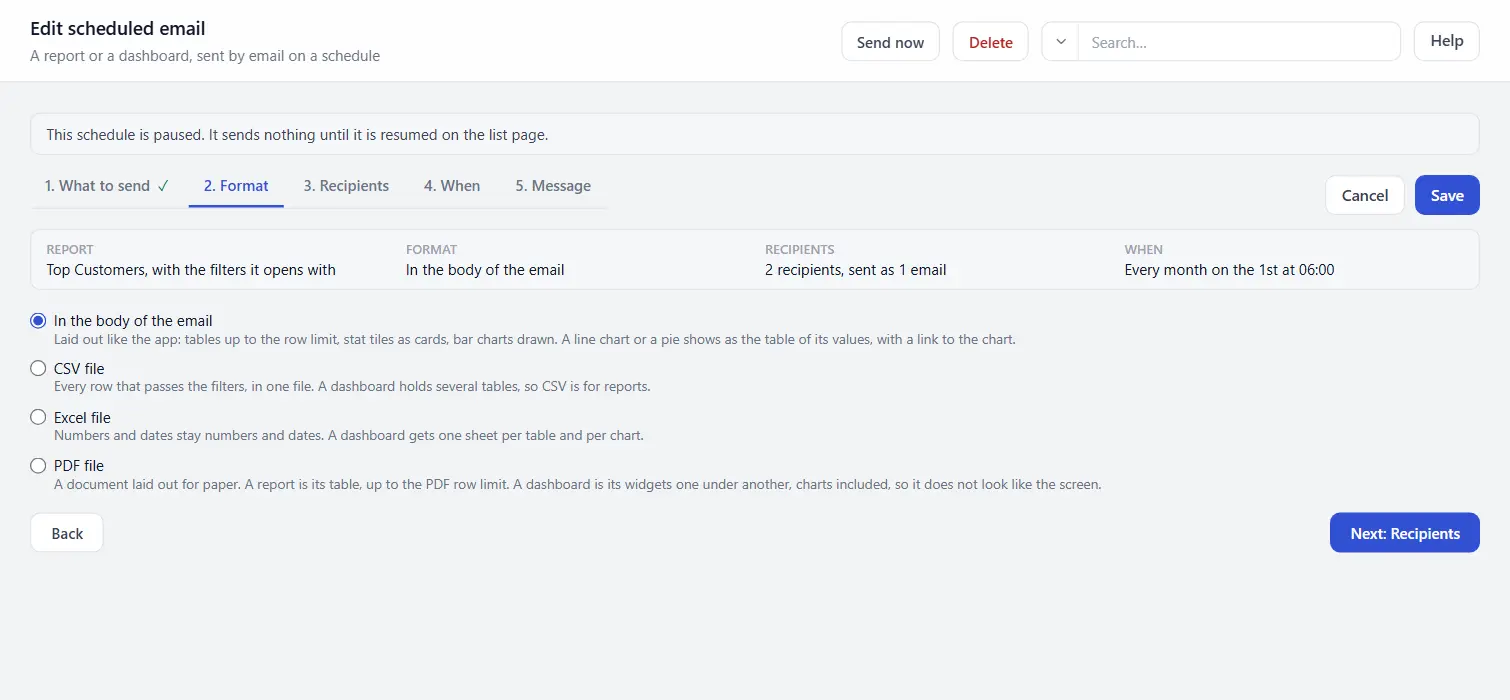
An email has no viewer, so its figures and dates follow the account's Formatting settings and each column's own formatting, never one person's preferences. See Formatting numbers, currencies, percentages and dates.
An emailed table has the columns and formats of the report page. The code that draws a dashboard also computes its emailed figures, under the filter values you chose.
Step 3: Recipients
- Search for a NetSuite record that has an email address, or type an address and choose Add.
- Set each recipient to To, CC or BCC.
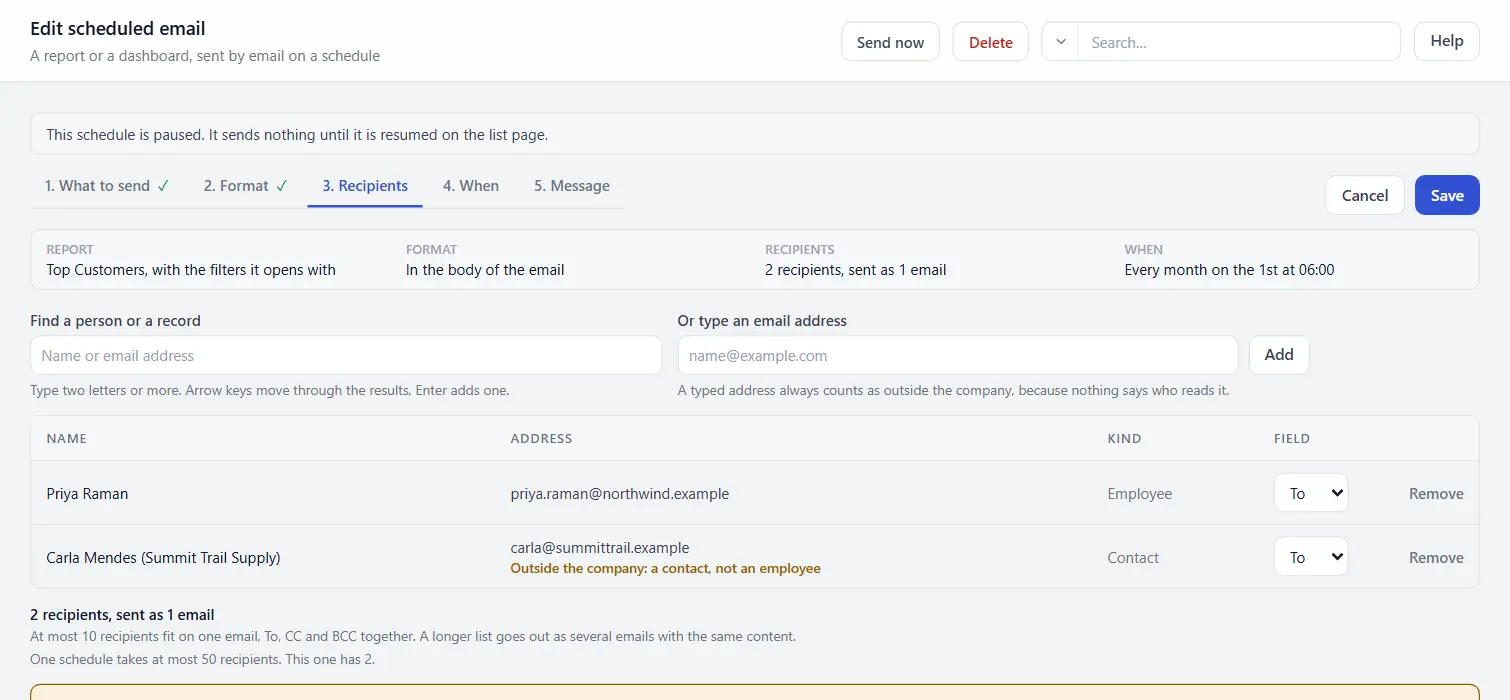
NetSuite's limits apply:
- One email goes to at most 10 recipients, counting To, CC and BCC together. A longer list is sent as several emails of up to 10. The screen shows the count as you add people, for example "14 recipients, sent as 2 emails of up to 10".
- An email whose recipients are all BCC is addressed to the sender, so it holds 9.
- One schedule takes at most 50 recipients, unless an admin changed
email.max_recipients.
The screen warns when report data will leave the company. A recipient counts as outside when it is:
- a typed address, even one on your own domain, because nothing says who reads it;
- a contact, customer, vendor or any record that is not an employee;
- an employee whose address is on another domain than the sender's.
An employee on the sender's domain shows no warning.
Step 4: When
- Choose every day, every weekday, every week on the days you tick, every two weeks, or every month on a day. Then set the time of day.
- Every time is in your NetSuite account's timezone, which the screen names.
- So is the day an email is written on. A filter or a widget set to This month or Year to date reads the month and the day of your account's timezone at the moment the email is sent. An email sent at 23:30 on the last day of a month reports that month.
- The screen shows the schedule as a sentence, such as "Every weekday at 08:00", and the next time it will send.
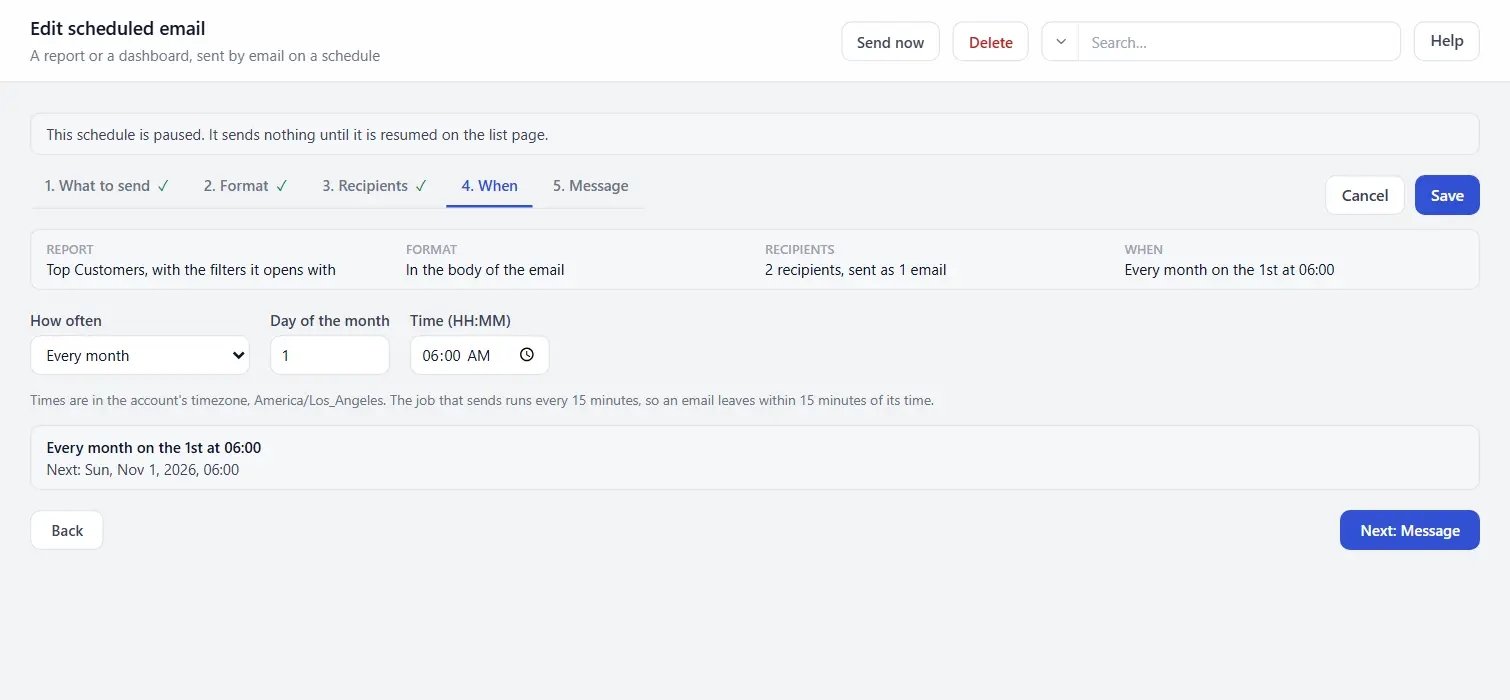
Three rules about timing:
- The job that sends emails runs every 15 minutes, so an email leaves within 15 minutes of its time.
- A monthly schedule on the 29th, 30th or 31st sends on the last day of a shorter month.
- If the job was stopped for several days, each schedule sends once when it starts again, not once for each missed day.
Step 5: Message
- Name of this schedule starts as the name of the report or dashboard until you type your own. The readers do not see it.
- Subject and Message are plain text. Four placeholders are filled in when the email is sent:
| Placeholder | Becomes |
|---|---|
{name} | The name of the report or dashboard |
{filters} | The period or filters in effect, in words |
{date} | The day the email is sent |
{link} | A link that opens the report or dashboard in Advanced Reports |
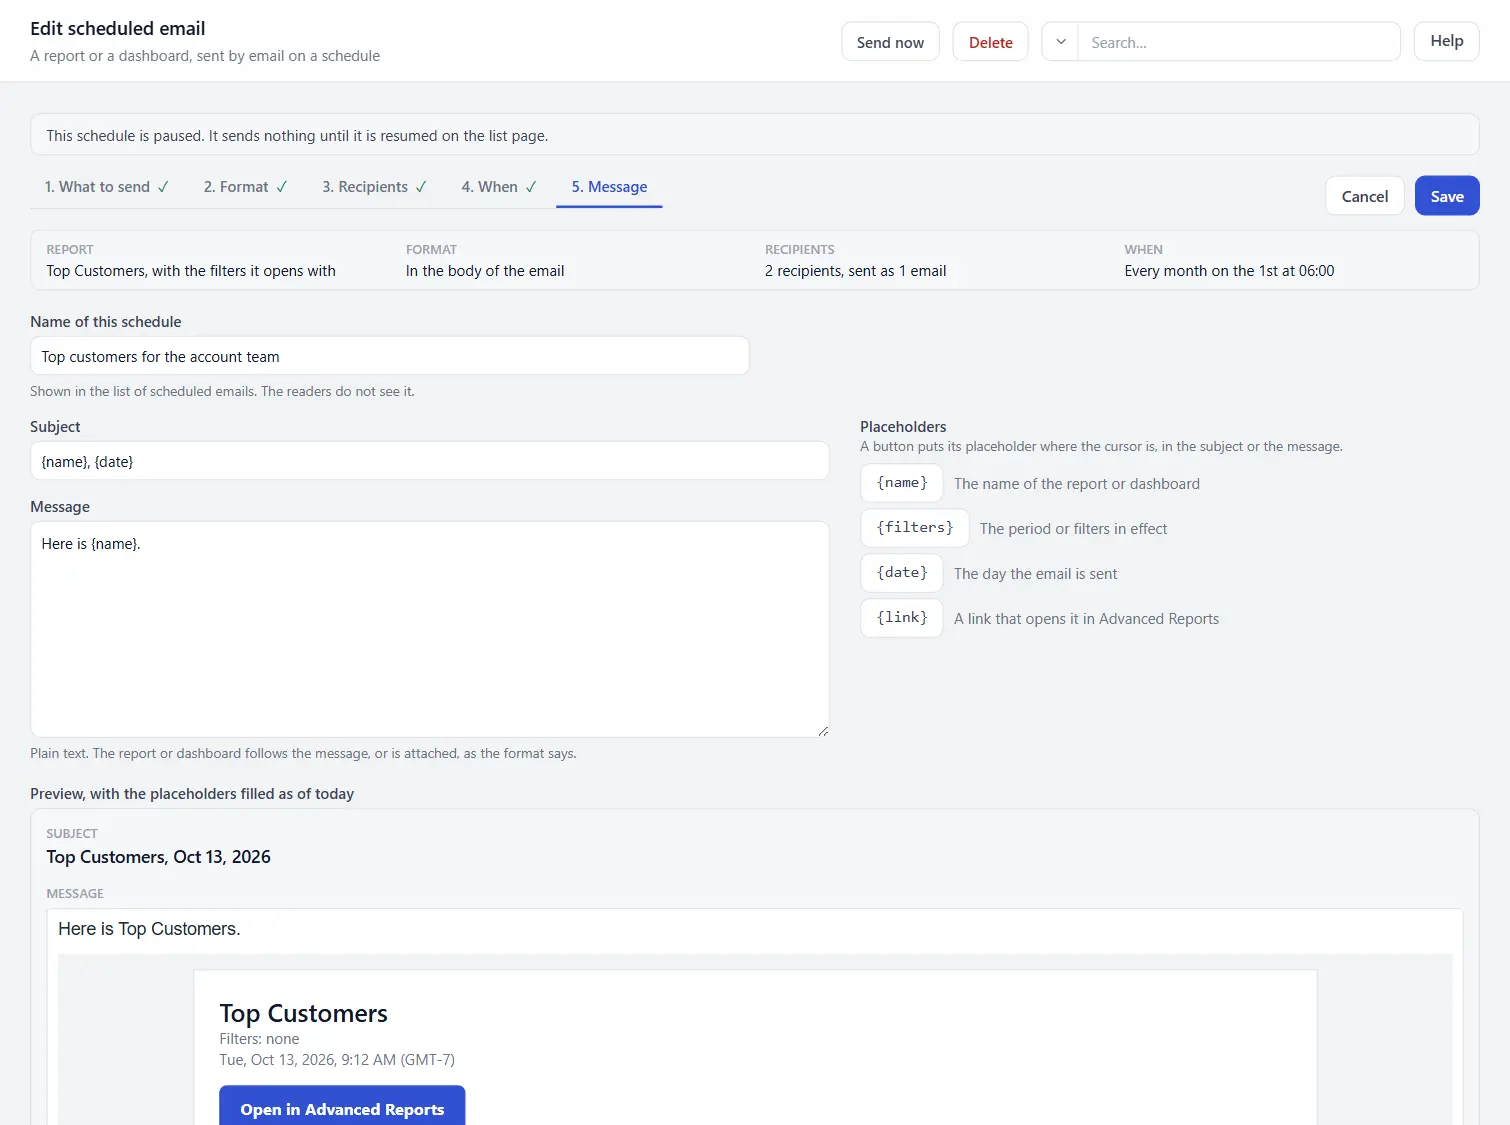
The preview shows the email as a mail reader shows it, at its real width, with the placeholders filled. It updates as you type.
- It sits beside the editor when the window has room for the whole email, and under the editor when it does not.
- When the format is In the body of the email, the report or dashboard appears under your message, with its own rows. While those rows load, or before you choose what to send, the preview shows sample rows. The line under the preview says which you are looking at.
- The link is the app's normal address, so the reader signs in to NetSuite to open it. The app never makes a public link.
Saving, and what the tab marks mean
A tab shows a mark once you have opened its step and left it.
| Mark | Meaning |
|---|---|
| Orange ! | The step still needs something. |
| Green check | The step is complete. |
| No mark | You have not opened the step yet. It gets a mark when you try to save. |
You can press Save scheduled email at any time. If something is missing:
- Nothing is saved. A list at the top of the screen names each missing thing on its own line, in the order of the steps, for example "Recipients: add at least one recipient."
- Click a line to open its step with the cursor in the field to fill.
- The list gets shorter as you fix things and goes away when nothing is missing. Dismiss hides it sooner.
- Press Save again.
Send me a test sends everything as it stands on the five steps, saved or not. A test needs a report or dashboard, a format and a subject. If one is missing, the test is not sent, and a list under the button says what to fill in.
Edit a scheduled email
- Open Manage, Scheduled emails and choose Edit on the row.
- Go straight to the step you want to change. The screen is the one you created the schedule on, with your choices filled in.
- Choose Save at the top right. Cancel asks before it discards changes you have not saved.
Delete and Send now are in the top bar. If something is missing, Save saves nothing and lists what is missing, as on a new schedule.
In the body of the email
Your message comes first. Under it, the email shows:
- the name of the report or dashboard;
- the filters in effect;
- the date and time with the offset from Greenwich, for example "Sun, Oct 11, 2026, 9:47 AM (GMT-4)";
- a blue Open in Advanced Reports button.
Because that block already names the report and its filters, a new scheduled email in this format starts with a one-line message, "Here is {name}." You can write your own. A scheduled email you saved earlier keeps the message it has.
A report is its table, styled like the grid in the app:
- A shaded heading row, a line between rows, numbers on the right.
- Numbers read in full or compact, as the report's page is set.
- If the report's page shows a totals row, the table ends with it, and it totals every row of the report.
- The table shows the first 50 rows. A longer report says so under the table, for example "The first 50 of 1,204 rows. Open the report for the rest." An admin can change the limit in the setting
email.body_max_rows.
A dashboard is its widgets one under another, in reading order. The dashboard's Group by applies.
| Widget | In the body |
|---|---|
| Stat tile | A card with the figure, the period, what it is compared with, and the change with an arrow in green or red. A tile with a coloured edge has it as its left border, in green, amber or red, with the word Good, Warning or Bad, and a caption is written under it. Four cards sit side by side, or two when a figure is long. |
| Table | Like a report's table, up to the same row limit. |
| Bar chart, horizontal bar | Drawn. Each bar has its label and its value. A vertical bar chart is drawn with horizontal bars. |
| Bar chart with a series | One bar for each series or period under its group, each named beside it, with its value. A stacked chart is one bar of coloured parts for each group, with its total and a key. |
| Bar chart with a second measure | The first measure as bars. The second measure is a column of figures beside them when it has its own scale or is a line on the page, and a second bar when it is drawn as bars on the same scale. |
| Reference line | A grey bar of its own under the bars, with its name and value. An email cannot draw a line across the bars. Under a line chart's table it is a sentence. |
| Line chart | The table of its values, one row for each point and one column for each line, with a See the chart link. A second measure is a column in its own formatting. |
| Comparison trend | Both totals and the change, then the table of both periods, with a See the chart link. With more periods or a second measure, a sentence for each measure gives every period's total and its change against the period reported, then the table has a column for each period and measure. |
| Pie, donut | Each slice with its value, its share and a bar, with a See the chart link. |
| A chart's colours and text | The bars and the shares take the colours the chart has on the page, pinned colours included. The chart's text is written at its size, in its font where the mail reader has it. |
| Statement | A table with its sections, subtotals and total. A statement with many periods prints in several tables, each repeating the first column. |
| Comparison table | A table with its sections and total lines, each change with its arrow, in green or red. A table with many columns prints in several tables, each repeating the first column. |
| Text note | As written. A note with live figures is written with the figures of the moment. |
| Ranked table | The table with its rank and share columns, then the lines under it: the lines shown, all others, the total and the share. |
| A chart's total | One line under the chart. |
| Commentary | Under its widget, or above it where its author set it above, with a rule down its left in the colour of its tone. The commentary of a stat tile is under the row of tiles, with the tile's name. |
| Section title | A heading with a rule under it, and its line of text. |
| Pages | Every page, in order, each under its name as a heading. |
Things to know about the body:
- An email cannot draw a line or a pie. Mail readers such as Gmail and Outlook remove the drawing code a web page uses, and block the images that could replace it. To send those charts drawn, use the PDF format.
- The email is 640 pixels wide, and grows up to 900 pixels when a table needs the room. A table that still does not fit prints in several tables one under another. Each repeats the first column, and each after the first starts with "Continued".
- Nothing in the email scrolls sideways, because Outlook and several other mail readers cannot scroll inside a message.
- Colours, widths and fonts are set in the ways Outlook keeps, so the button, the bars and the table shading show there as they do in Gmail.
- The email holds no images and no tracking. Its only link is the address of the report or dashboard in Advanced Reports.
Every PDF starts with the name of the report or dashboard, the filters in effect, and the date and time in your account's timezone with its offset from Greenwich. Each page is numbered at the bottom.
A report as a PDF is its table:
- The heading row repeats at the top of every page.
- Numbers read in full or compact, as the report's page is set.
- If the report's page shows a totals row, the PDF ends with it, and it totals every row of the report.
- The page turns to landscape when the columns need the width.
- It prints the first 2,000 rows. A longer report says so above the table, for example "The first 2,000 of 31,402 rows. Open the report for the rest.", with a link. An admin can change the limit in the setting
email.pdf_max_rows. To send every row, use CSV or Excel.
A dashboard as a PDF does not look like the dashboard on screen. The screen places widgets side by side on a grid. The PDF prints them one under another, in reading order, at the full width of the page. The figures, the grouping, the sort order and the limits are the same as on screen, and the dashboard's Group by applies.
| Widget | In the PDF |
|---|---|
| Stat tile | Four to a row, each with its figure, what it is compared with on its own line, and the change in green or red. A coloured edge is the tile's left border, with the word Good, Warning or Bad, and a caption is written under it. |
| Table | Its first 200 rows, with its totals row. A longer table says how many rows it has and links to the dashboard. The setting is email.pdf_widget_max_rows. |
| Bar chart | Its bars with the value beside each one. A chart with more than 16 bars prints them as horizontal bars, so every label has room. |
| Line chart | One line for each series, with one label under each point, and no point markers. Large values print on the axis in thousands or millions, and a line under the chart says which. When the labels are too many to fit, every second or third one prints, and the full list follows under the chart. A chart with a single point prints that value in a small table. The part of a line after today, which the screen draws dashed, prints in a paler shade. |
| Bar chart with a series, a second measure or a reference line | Horizontal bars, whichever way they run on screen. Each bar is named by its series or period, a stack has a key, a second measure on its own scale is a column of figures, and a reference line is a grey bar under the others. The PDF cannot draw bars side by side upright, or a line across bars. |
| Line chart with a reference line | The reference line is a grey line of its own in the chart, named in the key. |
| Line chart with two scales | Two charts, one under the other, one for each scale. A PDF chart has one scale. |
| A chart's colours and text | The bars, slices, lines and keys take the colours the chart has on the page. The chart's text is written at its size, in Helvetica, Times or Courier when one is chosen. The part of a line still to come is a paler shade of its colour. |
| Comparison trend | The totals and the change as the key on screen writes them, then one chart of every period. Each line prints in the colour it has on the page. A PDF line cannot be dashed, so when two periods share a colour, such as the periods of a second measure, each earlier one prints in a lighter shade, and the key names it. A second measure on its own scale is a second chart under the first. |
| Line chart with values written | The last value of each line is a sentence under the chart. Values on every point are the table of values under the chart. A soft fill is not drawn. |
| Pie, donut | A pie, beside a list of every slice with its value and its share. |
| Statement | A table with its sections, subtotals and total. A statement too wide for the page prints in several blocks of columns, each one repeating the first column. |
| Comparison table | A table with its sections and total lines, each change with its arrow, in green or red. A table too wide for the page prints in several blocks of columns, each one repeating the first column. |
| Text note | As written. |
| Ranked table, a chart's total, commentary | As in the body: the rank and share columns with the lines under the table, the total under a chart, and each commentary under its widget or above it. |
| Section title, pages | A heading with a rule under it. Each page after the first starts a new sheet, and so does a section title set to start a new printed page. |
- On a landscape page, two charts that follow each other print side by side, so a page is not left half empty.
- A chart is never split across two pages.
- Hovering, sorting and drill-through do not exist on paper. Use the link in the email to open the dashboard.
Size limits
NetSuite limits one attached file to 10 MB and a whole message to 15 MB. The app measures both before sending.
- When a file is too large, the email is sent without it, with a link to the report or dashboard in its place. The history says Sent without its attachment.
- This applies to a PDF as it does to a CSV or an Excel file.
- An Excel file reaches the limit sooner than a CSV of the same rows, because the app writes it without compression.
What an email may carry
An email carries only what the person who created the schedule is allowed to open.
- The job checks this each time it sends, against that person's roles on that day.
- If they have lost access to the report or dashboard, or have been made inactive, nothing is sent. The run is recorded as failed with that reason.
- On a dashboard, a widget over a report they cannot open is left out and named.
- An admin whose role may schedule emails can edit someone else's schedule. The schedule stays limited to what its creator may open.
- The job does not ask whether the creator may still schedule emails. A schedule made while a role was allowed keeps running after the role is taken off the list.
The sender
NetSuite requires every email to come from an employee. An admin picks that employee under Manage, Configuration, in the setting email.sender_employee_id.
Until a sender is set you can still create scheduled emails. Nothing is sent, the screens say so, and each run is recorded as failed with that reason.
Manage scheduled emails
Manage, Scheduled emails has these tabs:
| Tab | Who sees it | What it lists |
|---|---|---|
| My scheduled emails | Everyone who sees the page | The ones you created, with what each sends, its schedule, its next run, its last result and the Sending switch |
| All scheduled emails | Admins | Everyone's, with the owner |
| History | Everyone who sees the page. You see your own schedules, admins see all | Every email sent or tried, with its recipients, format, size and outcome |
| Errors | Admins | The emails that failed, that NetSuite did not send, or that were not delivered, each with its reason and a Send again button |
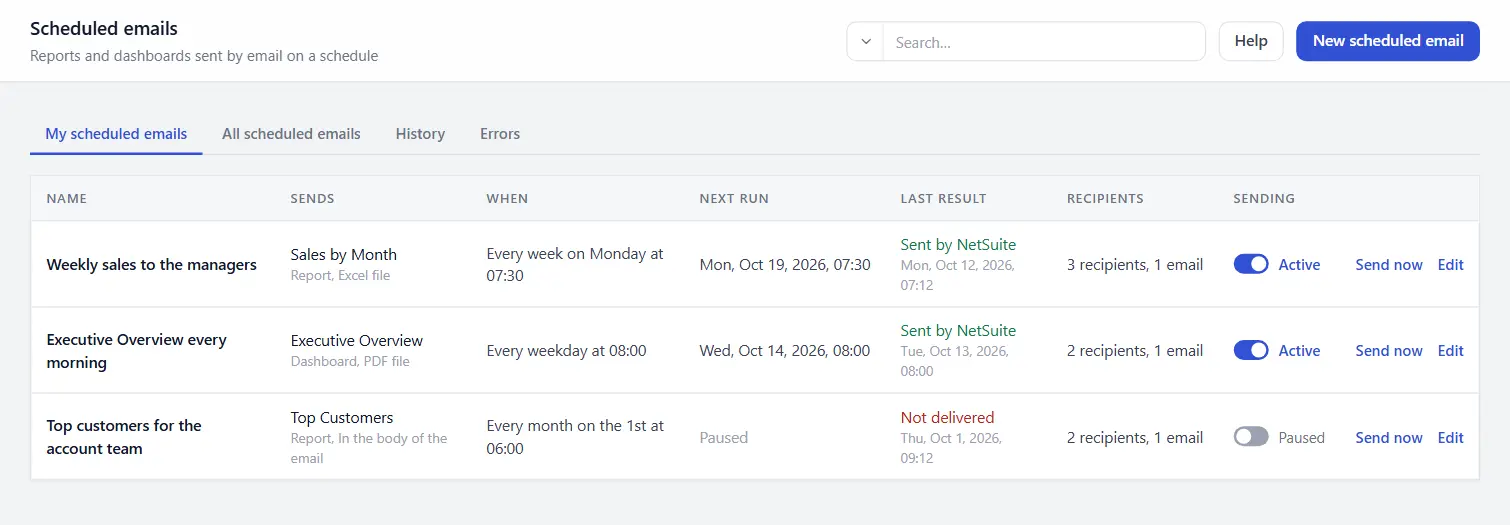
Pause and resume
The Sending switch is to the right and blue, with the word Active, while the schedule sends.
- Click the switch to pause. It moves to the left, turns grey and reads Paused. A paused schedule sends nothing on its schedule.
- Click it again to resume. The schedule continues from its next future time.
Send now
Send now sends a scheduled email to all its recipients right away, once, so you can check a real transmission. It is on each row of My scheduled emails and All scheduled emails, and in the top bar when you edit a saved schedule. The owner of the schedule and admins can use it, when their role may schedule emails.
- Choose Send now. On the edit screen the button is greyed while you have unsaved changes, with "Save your changes first." It sends the schedule as it is saved.
- Confirm. The question names the scheduled email, the number of recipients, the number of emails they make, and how many recipients are outside the company.
- The screen shows "Queued. It goes out within a few minutes."
- The row's last result changes once the email has gone. The history lists it with the kind Send now and the name of the person who asked.
Send now follows the same rules as a scheduled run. It carries only what the creator of the schedule may open, it splits a long list into emails of 10, and the size limits apply. It differs in three ways:
- It does not move the schedule. The next run stays what it was.
- It works on a paused schedule, which stays paused.
- It waits its turn. While a scheduled run of the same email is under way, the app refuses Send now with a sentence that says so. Choosing it twice in a row sends once.
Send again
Send again queues the email for the job's next run, within 15 minutes. It is offered for an email that failed, that NetSuite did not send, or that was not delivered.
- One failed email is sent again to its own recipients.
- A run that failed before sending anything is sent again to the schedule's recipients.
- The app never sends an email again by itself, whatever its outcome. Fix the cause first, then choose Send again.
Reading the history
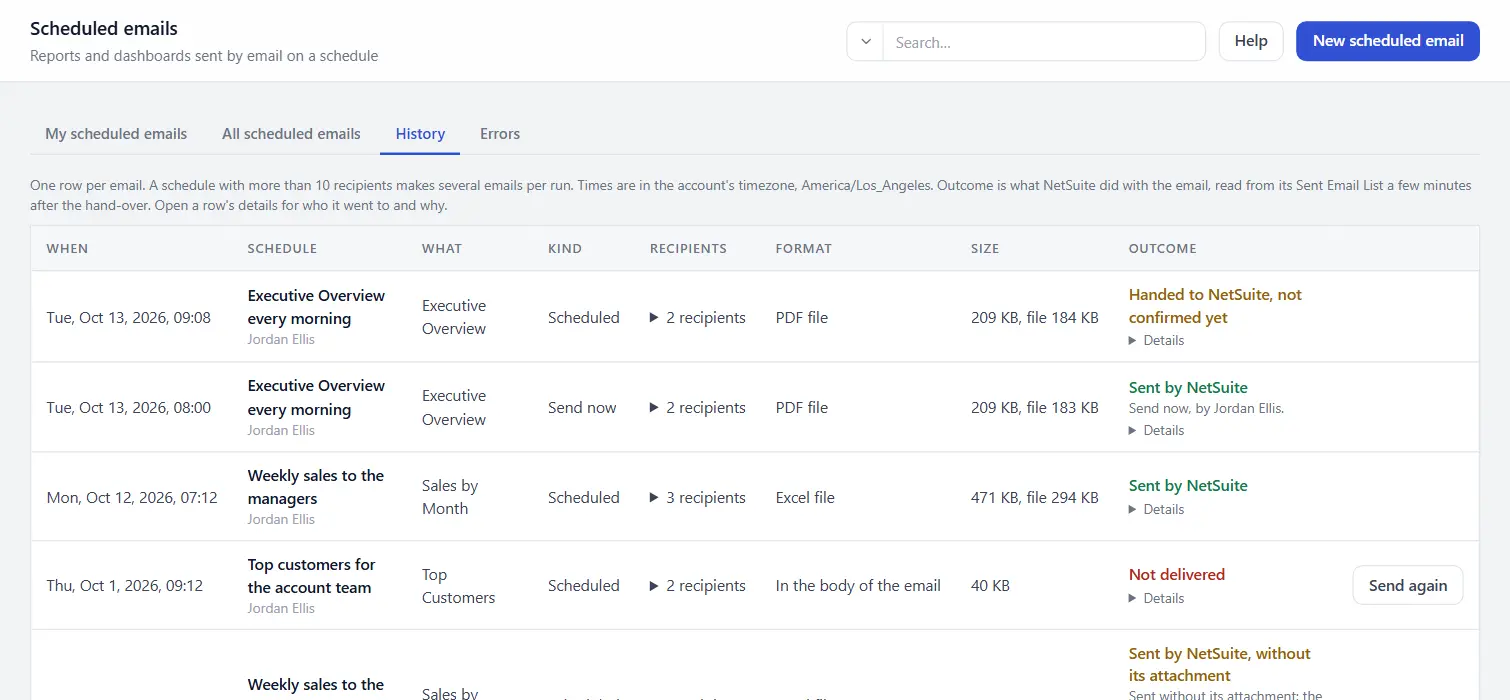
When the app sends an email, NetSuite accepts it and answers without an error. That is the hand-over. It does not mean the email left the account. NetSuite accepts an email even when it then sends it to someone else or does not send it at all.
So the app checks. Every 15 minutes the email job looks up the emails it handed over in NetSuite's own Sent Email List, and writes what it finds in the Outcome column of the history.
| Outcome | What it means |
|---|---|
| Sent by NetSuite (green) | NetSuite sent the email to the recipients it was for. |
| Sent to a different address (amber) | NetSuite sent the email, but to someone else. The details name the address. The account reroutes outgoing email. |
| Not sent by NetSuite (red) | NetSuite accepted the email and did not send it. The details give NetSuite's reason, or the likely one when it gives none. |
| Not delivered (red) | NetSuite sent the email and a recipient did not get it. The details name each such recipient and the mail server's reason. |
| Could not be confirmed (grey) | The app found no entry it could tell was this email within the cut-off, 48 hours unless changed. The email may still have gone out. |
| Handed to NetSuite for sending (grey) | The account does not let the email job read the Sent Email List, or the lookup is switched off. The app cannot say more. |
| Handed to NetSuite, not confirmed yet (amber) | The email job has not looked it up yet. It does within 15 minutes. |
| Not confirmed | The job stopped while that email was being sent, and NetSuite does not say whether it went out. Ask a recipient, then choose Send again if it did not arrive. |
More about the outcome:
- Details on a row shows who the email went to and why. It also shows the sender checks NetSuite reports for the message (SPF, DKIM and DMARC) and which entry of the Sent Email List the outcome was read from.
- The Last result of a scheduled email follows the same outcomes for its latest run. It reads Sent by NetSuite only when every email of the run was sent to its recipients.
- A mail server can refuse an email hours after it left. The app looks at a sent email again until the cut-off, and changes its outcome to Not delivered if NetSuite reports a refusal.
- The app finds an email in the list by a short reference it writes into each email, such as "Ref AR-106", next to the date. When the reference is not in the part of the text NetSuite keeps, it uses the subject, the recipients and the time. If two emails could be the same entry, it gives the entry to neither and says Could not be confirmed.
- You can read the list yourself in NetSuite under Setup, Company, Communication, Sent Email List.
If an email does not arrive
Look at the outcome in the history first. It says which of these cases you are in.
A yellow notice at the top of the scheduled email screens means the latest email did not reach its recipients because of how the account routes email. That is the first case below.
Sent to a different address, or Not sent by NetSuite with no reason
The account reroutes outgoing email. NetSuite has a setting that sends every email to the logged-in user, or to fixed addresses, in place of the real recipients. Sandbox, development and demo accounts are usually set this way, so that a test does not write to customers.
- An email sent by Send now or Send me a test goes to the person who pressed the button.
- An email sent by the schedule has no logged-in user, so NetSuite sends nothing.
To change it:
- In NetSuite, an administrator of the account opens Setup, Company, Email, Email Preferences.
- They change where outgoing email is sent.
- The yellow notice goes away once an email has been sent to its recipients.
The app cannot read or change this setting. It only reports what NetSuite's list shows.
Not sent by NetSuite, with a reason
The details give NetSuite's reason. Fix what it names, then choose Send again.
Not delivered
The details name each recipient and what happened.
- Not delivered, with the mail server's reason: the receiving server refused the email. A full mailbox or an address that no longer exists are common reasons.
- NetSuite left this address out: the address is on NetSuite's bounced address list, because an earlier email to it bounced. NetSuite sends nothing to it until someone removes it, under Lists, Relationships, Bounced Email Addresses.
Sent by NetSuite, and still not in the inbox
The receiving mail server accepted the email and then filtered it. The usual cause is the sender's address. When the sender is on your company's own domain, your mail server sees a message that claims to come from inside the company but was sent by NetSuite. It filters the message unless the domain says NetSuite may send for it. The details of the row show whether NetSuite reports the message as passing DMARC.
- Set up DKIM for the sender's domain in NetSuite, under Setup, Company, Email, Email Preferences.
- Add NetSuite to the domain's SPF record. Your domain administrator does this where the domain's DNS is managed.
- Use a shared address such as reports@ as the sender, not a person's own address. A shared mailbox is easier to authorise, and replies do not go to one person.
- Check the recipient's junk folder.
To test, use Send now, wait 15 minutes, and read the outcome in the history.
A chart is missing or wrong in a PDF
An admin can set email.pdf_safe_charts to 1. Charts then print as tables and coloured bars only: a line chart becomes the table of its values and a pie becomes its list of shares.
Settings
Eleven settings under Manage, Configuration apply. One names the roles that may schedule emails, four are for PDF files and two for the confirmation of what NetSuite did with an email. See the settings reference.
Related: Reading a report · Building a dashboard · Settings reference · Categories, audience and rights